Ragnaros 25-man heroic mode strategy guide
The world second kill has now been claimed and it's time for us to give out our strategy. This guide works the best with the Ragnaros kill video, as you can see the strategy implemented in action. There are also some personal tips to getting better raid awareness and focus to important abilities, as well as tips to healers, tanks, melee and ranged. There will be specific guides to some classes for this encounter, so those lucky to play those should read them as well.
The raid setup
Tanks:
1 Feral Druid (Sejta)
1 Protection Paladin (Lazei)
Healers:
1 Holy Paladin (Ilonie)
1 Restoration Druid (Anaram)
1 Holy Priest (Jhazrun)
DPS:
4 Frost Death Knights (Synti, Tuutti, Snakkimon, Nize)
3 Hunters (Kruf, Krimsy, Devai) 1 Survival and 2 Marksman
3 Shadow Priests (xenophics, Fragi, Ussó)
3 Demonology Warlocks (Manni, Jubeto, Diivil)
3 Balance Druids (Lappe, Lihas, Arx)
2 Fury Warriors (Wakoz, Verdisha)
1 Arcane Mage (Baltha)
1 Combat Rogue (Rakez)
About the raid setup: The fight needs two tanks, and the amount of healers depends on the amount of dps your raid can do. This strategy is build around the need to reach phase 4 with only two meteors. This makes phase 3 a dps check, where certain classes and specs (like a warrior and demo warlock) shine. The need of burst AoE in phase 2 prevents the guilds from stacking only strong specs and classes that are strong in phase 4. Good AoE classes (in roughly the order from the best to worst) for Molten Seeds are: Balance Druid, Survival Hunter, Frost Death Knight, Shadow Priest and Warlock. The best healing classes for the encounter are Holy Paladin, Holy Priest and Restoration Druid, Resto Druid being the strongest healer overall.
You also want to make sure you have enough Death Grips, Typhoons, stuns and burst dps to handle Sons of Flame during intermissions.
Overview of the phases
The boss has 4 phases and 2 intermissions between them.
Phase 1 (100%-70%) is about not dying and syncing the Magma Trap explosions with Ragnaros' other abilities.
The first intermission is about killing Sons of Flame before they reach Ragnaros' hammer.
Phase 2 (70%-40%) is about handling Molten Seeds and killiing the Molten Elementals that spawn.
The second intermission is the same as the first one with the addition of Lava Scions that need to be tanked.
Phase 3 (40%-10%) is all about burning Ragnaros down to 10% before too many meteors spawn.
Phase 4 is when Ragnaros gets up from the lava and unleashes the most devious abilities upon the raid. Malfurion Stormrage (Cloud Burst), Hamuul Runetotem (Roots) and Cenarius (Breadth of Frost) come to aid the raid and make the kill possible with their abilities.
Phase 1 - Stayin' Alive
The first phase of Ragnaros fight is all about playing it safe - this strategy should never have issues with the enrage timer so there's no need to take any risks to increase dps in phase 1.
Ragnaros casts Wrath of Ragnaros (inflicts damage to enemies within 6 yards of the target, knocking them in random direction) and Hand of Ragnaros (inflicts damage within 55 yards, knocking them back). Basically melee worries about Hand of Ragnaros, and ranged about Wrath of Ragnaros. Everyone also needs to pay attention to not standing too close to Magma Traps so they don't get knocked into one by these abilities.
Melee should be standing in a pile on the opposite side of the platform from tanks, where they can hit the boss still from behind.
Ranged and healers should be spread around the platform, each standing at least 6 yards away from each other.
It's very important that the whole raid gets fire resistance aura or totem, so make sure you position your paladins and shamans so that you cover the whole area.
Ragnaros also casts Sulfuras Smash, which kills if you stand under the hammer when it lands. When hitting the ground the hammer sends lava waves to 3 directions. It is possible to dodge Sulfuras Smash to melee, and melee dps should always do that. Healers and ranged dps dodge the lava waves, and then spread out again.
Magma Traps:
Always before taking a Magma Trap make sure that:
- The Magma Trap Vulnerability debuff has expired on the raid
- Everyone has enough hp to survive (usually means 95% or more for classes without damage reductions)
- Neither Hand of Ragnaros or Wrath of Ragnaros is about to be cast
- Everyone is clear on who's going to take the trap
It helps to have the player on Trap Duty do a countdown before triggering the trap. This way players with damage reduction cooldowns can mitigate damage, or if they are too low, use their immunities. A countdown gives time for AMS, Dispersion, Power Word Shield, Ice Block, Deterrence, Raid wide last stand, Defencive Stance, and of course healthstone. The less healers your raid runs with, the more important the timing of the trap is, and making sure people use their cooldowns on the traps.
What makes this phase challenging is that when you combine everything together you can get very unlucky combos:
A knockback to the trap:
The area around Magma Traps should always be clear. Melee and tanks need to watch the area behind them closely.
Need to move:
A ranged runs accidentaly to melee range, and first gets hit by Hand of Ragnaros (to trap/Lava Wave) and then also Wrath of Ragnaros (to trap/Lava Wave), or has too low hp to survive both Hand and Wrath.
Spreading:
People need to be ready to look for a new place to stand after a Magma trap is cast. They also need to dodge lava waves. When Wrath of Ragnaros is about to come it's essential that ranged players check their proximity to other players. Healers should always be given the right to stand wherever they want while dps gives room for them.
Healing tips: Save as much mana as you can - there's no hurry to heal up the raid after a trap as long as everyone is above 50% hp. Prioritize healing on those without damage reduction abilities. Using Aura Mastery to Magma Traps helps reduce the damage.
Intermission 1 - Handling Sons of Flame
Ragnaros smashes his hammer to the ground and spawns 8 Son of Flame adds that try to reach the hammer. If they do they blow up and wipe the raid. When the Sons lose hitpoints they slow down; after 50% they are quite slow already and below 25% they crawl. Always dps all of them below 50% first and then go for the kills.
Note that unlike the normal mode, there are no fixed patterns to the Son spawns and they can all spawn on the same side of the hammer, so everyone has to pay attention when the pillars marking the spawn points appear to figure out which mobs is theirs.
The dps in raids should be assigned to elementals in pairs. Death Knights and Balance Druids really shine here, so split them up to both sides. Having two dps on each elemental takes 16 dps, and if you run with more the rest should be "freelancers" that run to the side which is closer to hammer or if the hammer is in the middle, has more elementals. If you have more than two balance druids it's recommended that the extra are freelancers.
We used two tactics on the Sons:
- Knockback first and grip any that run loose
- Grip any that are further away first and then knockback the whole pile
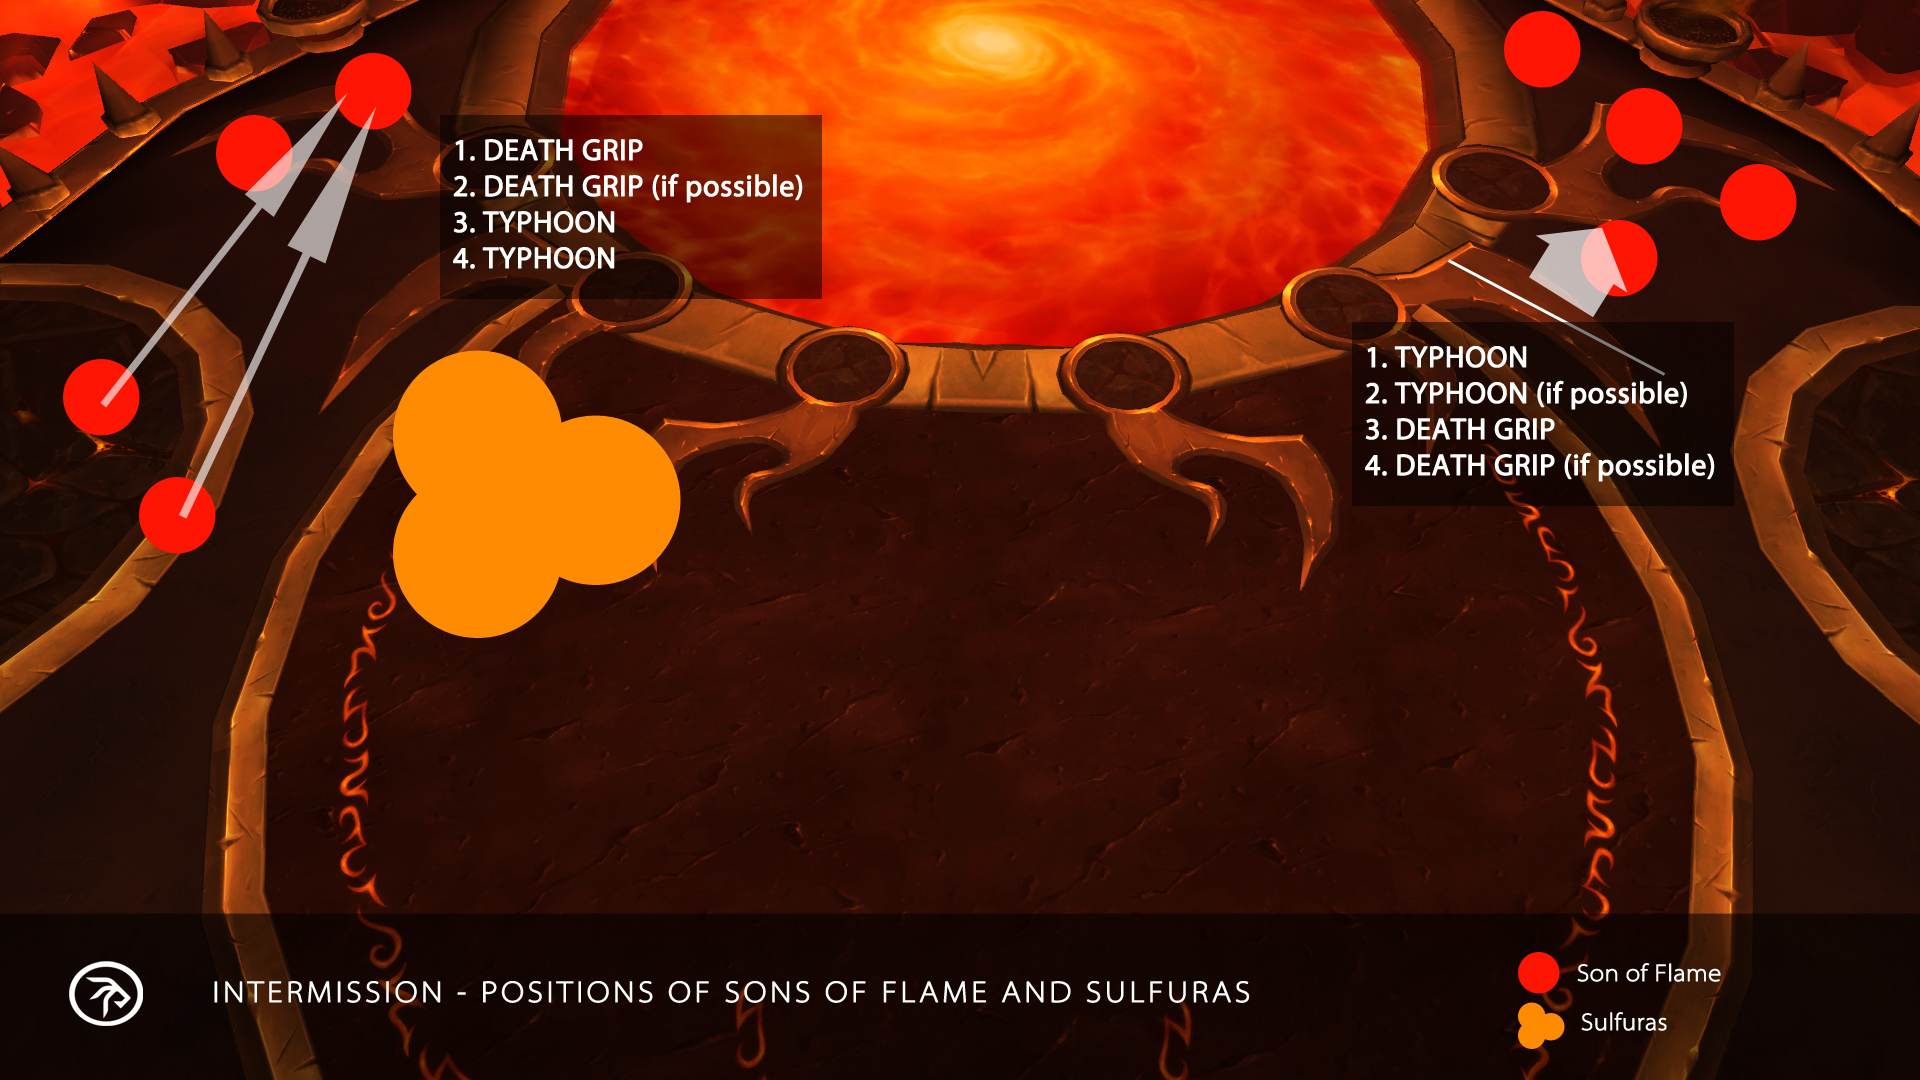
Don't forget to assign your holy paladins and tanks on stuns. It would be optimal to have one stun on each Son, but it wasn't possible with our setup. The tanks and healers should be assigned stunning those Sons that have dps without stuns assigned on them.
Good abilities to remember and use: Charge stun, Bash (moonkins can also use this!), pet stuns (hunter wasp pet, feral spirit, Felguard Axe Toss).
Healing tips: This is a very healing intensive phase, use whatever cooldowns you can and prioritize healing those who have been low on hp longest as the randomly targetted bolts cannot hit the same player twice in a row. You'll likely have nearly zero mana after this phase. Make sure healers are assigned to dif ferent parts of the platform to ensure everyone is covered by at least one healer.
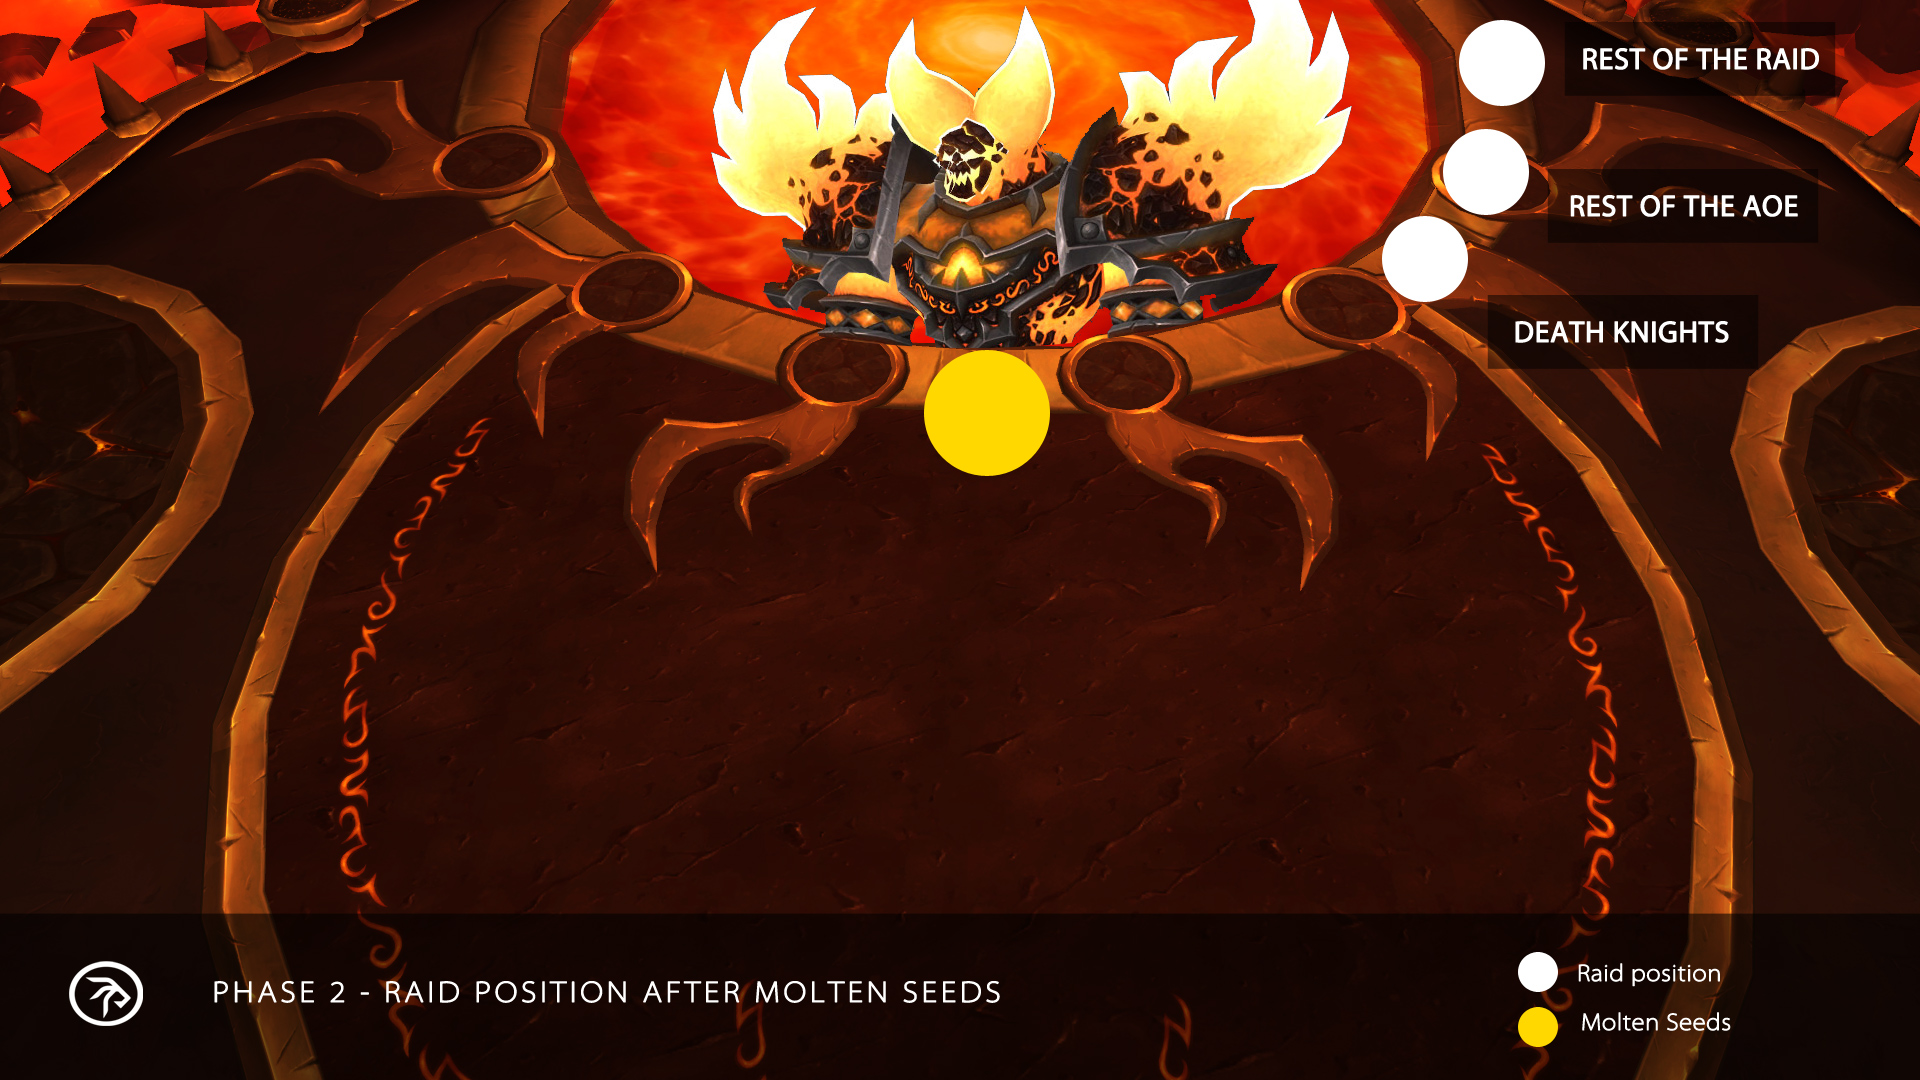
Phase 2 - Burst AoE
With our tactic it is essential to bring enough dps to blow up the Molten Elementals before they reach the raid. 20 Molten Seeds launch from the edges of the platform, targeting the position of a random player, and do some initial damage when they land, damage proportional to the distance to players when they explode, and spawn a Molten Elemental after the explosion. The elementals fixate on a player and run straight to them. When the adds are close to each other they gain buffs from each other that increase their damage and make them immune to snares and crowd control abilities. With this tactic there are enough stacks to one shot everyone if the adds make it to their targets so it is very important that they are nuked down before they reach the raid.
If you have 3 Magma Traps left from phase 1 (and can make it with 3 seeds) you should blow the first trap up immediately when the random damage from intermission stops. You can use your raid cooldowns after blowing up traps, for instance Balance Druid Tranquility.

We gathered to the middle of the platform in front of Ragnaros (melee range, don't fall into lava) and waited for Molten Seed timer to finish. When the timer disappears everyone runs to the right side (melee range) and dps that can't AoE goes all the way back to the corner. We used Stampeding Roar each time to minimize deaths. Two druids is enough to have it ready every time.
Tips to AoE:
Death Knight: Just before the seeds activate use DnD, then AMS and when they activae spam Howling Blast and run back like mad. Stand close enough to the mobs to hit with all the Howling Blasts.
Shadow Priest: A hunter should position their pet just a bit to the right of the pile, near the lava. Just before the Seeds activate shield yourself and start channeling Mind Sear to the pet. Targetting the pet isn't always easy, so either use a macro or focus.
Balance Druid: If you don't go oom, channel Hurricane and when the seeds activate blow up your mushrooms, run to the corner and use your typhoon on the way.
Warlock: Cast your teleport out of the raid before the Seeds activate. You should have time to cast 2 Seed of Corruptions to the activated adds before teleporting, but don't risk it.
It is essential that you bring enough AoE dps to get the Seeds down safely each try. Because of this, and the tight dps requirement in phase 3 it's important that everyone does their AoE properly.
Always make sure that while killing elementals and running away from them you stay in melee range (the yellow graphic on the platform next to lava). This way you don't ever have to dodge Sulfuras Smash. When running away from the elementals make sure you dodge to the edge of the platform, since the lava damage zone comes a bit further than the graphic is in the corner.
When the Seeds die, move away from melee and dodge the Engulfing Flames. 1 tick from them doesn't kill you from 100% hitpoints to 0, but 2 ticks will if you have no damage reduction. There's generally no big hurry in dpsing the boss in this phase so play it safe.
If the timer isn't correct (it always isn't) and the adds spawn spread and there are separate Seeds closer to the camp so it might be a good idea to use Rallying Cry so that they don't die to the initial explosion damage.
In the end of this phase it is adviced that you give your melee time to get full rage/energy/runes and cast Army of the Dead. When boss hits 40% and starts casting splitting blow do as much damage on it as possible, as it's free damage for what you need to do in phase 3.
Healing tips: Again, try to save as much mana as possible. There's no rush to heal up the raid after a Magma Trap unless the trap is taken too late. Your UI should show who in the raid has aggro from the elementals so you can prioritize healing those in case the AoE isn't enough to get every single elemental down before they reach the raid. During the dances there's again no rush to heal people up as there's no unavoidable damage coming, so use efficient heals to slowly heal the raid up for next trap.
Intermission 2 - Sons and Scions
This transition is the same as the first one, except two Lava Scions spawn to both sides of the platform, and they need to be tanked. Tanks need to be on the move and healers need to heal more, so you might have less stuns on the Sons. The Scions cast Blazing heat to players, which periodically spawns a flame under the player. If a Son or a Scion goes on top of the flame it heals, and Sons healing often cause a wipe. Players need to position theirselves so that the first fire patches don't come to the route Sons are going, and keep on the move so that they don't stay standing in the fire. Abilities like AMS and Iceblock work on the debuff if cast immediately.
One Son should be left alive but low (~15%) until there is 5 seconds left on intermission timer to buy more time to dps the Scions before going into the burn phase where every bit of damage counts.
Healing tips: Like the first intermissions, but remember that tanks are going to be taking extra damage as they're tanking the Scions so they need some extra love.
Phase 3 - The Burn
When the intermission timer is up, kill the last Son before Ragnaros blows it up and wipes the raid and pop Bloodlust/Heroism almost immediately when you can target the boss.

This phase is all about getting the boss to 10% before the third wave of Living Meteors spawn. The first meteor lands after 52 seconds, and the next waves come with 45 second intervals. So you have about 141 seconds to get the boss from 38% (or how low you got it in the end of phase 2) to 10% when the roleplay starts and the boss doesn't spawn any more meteors.
The meteors need to be kited in a way that doesn't hurt raid dps, meaning they need to be kept away from the caster spots as much as possible.

It should be noted that the DoT left from knocking a meteor causes spell pushbacks so it's beneficial to have classes who don't suffer from that do the knocks whenever possible.
Ragnaros keeps casting Engulfing Flames and Sulfuras Smash through this phase, everyone needs to pay attention and not to die to those as you cannot afford to lose any dps here.
Healing tips: Conserve mana, only heal if you must as you'll need all the mana you can save in the next phase.
Phase 4 - Chaos
During the brief roleplay before phase 4 starts for real, the meteors should be kited to the extreme edges of the platform. Note that they can be knocked while they're frozen during the transition also.
As soon as the roleplay event is over the boss starts applying a stacking DoT called Superheated on every player in the raid, which can only be removed by standing in the frost patch created by Breadth of Frost. However, if at any time there's more than 10 players in a 6 yard radius, the boss will cast Magma Geyser on that spot, destroying the frost patch if nearby and causing extra damage to the players. Superheated can be temporarily mitigated by immunity abilities.
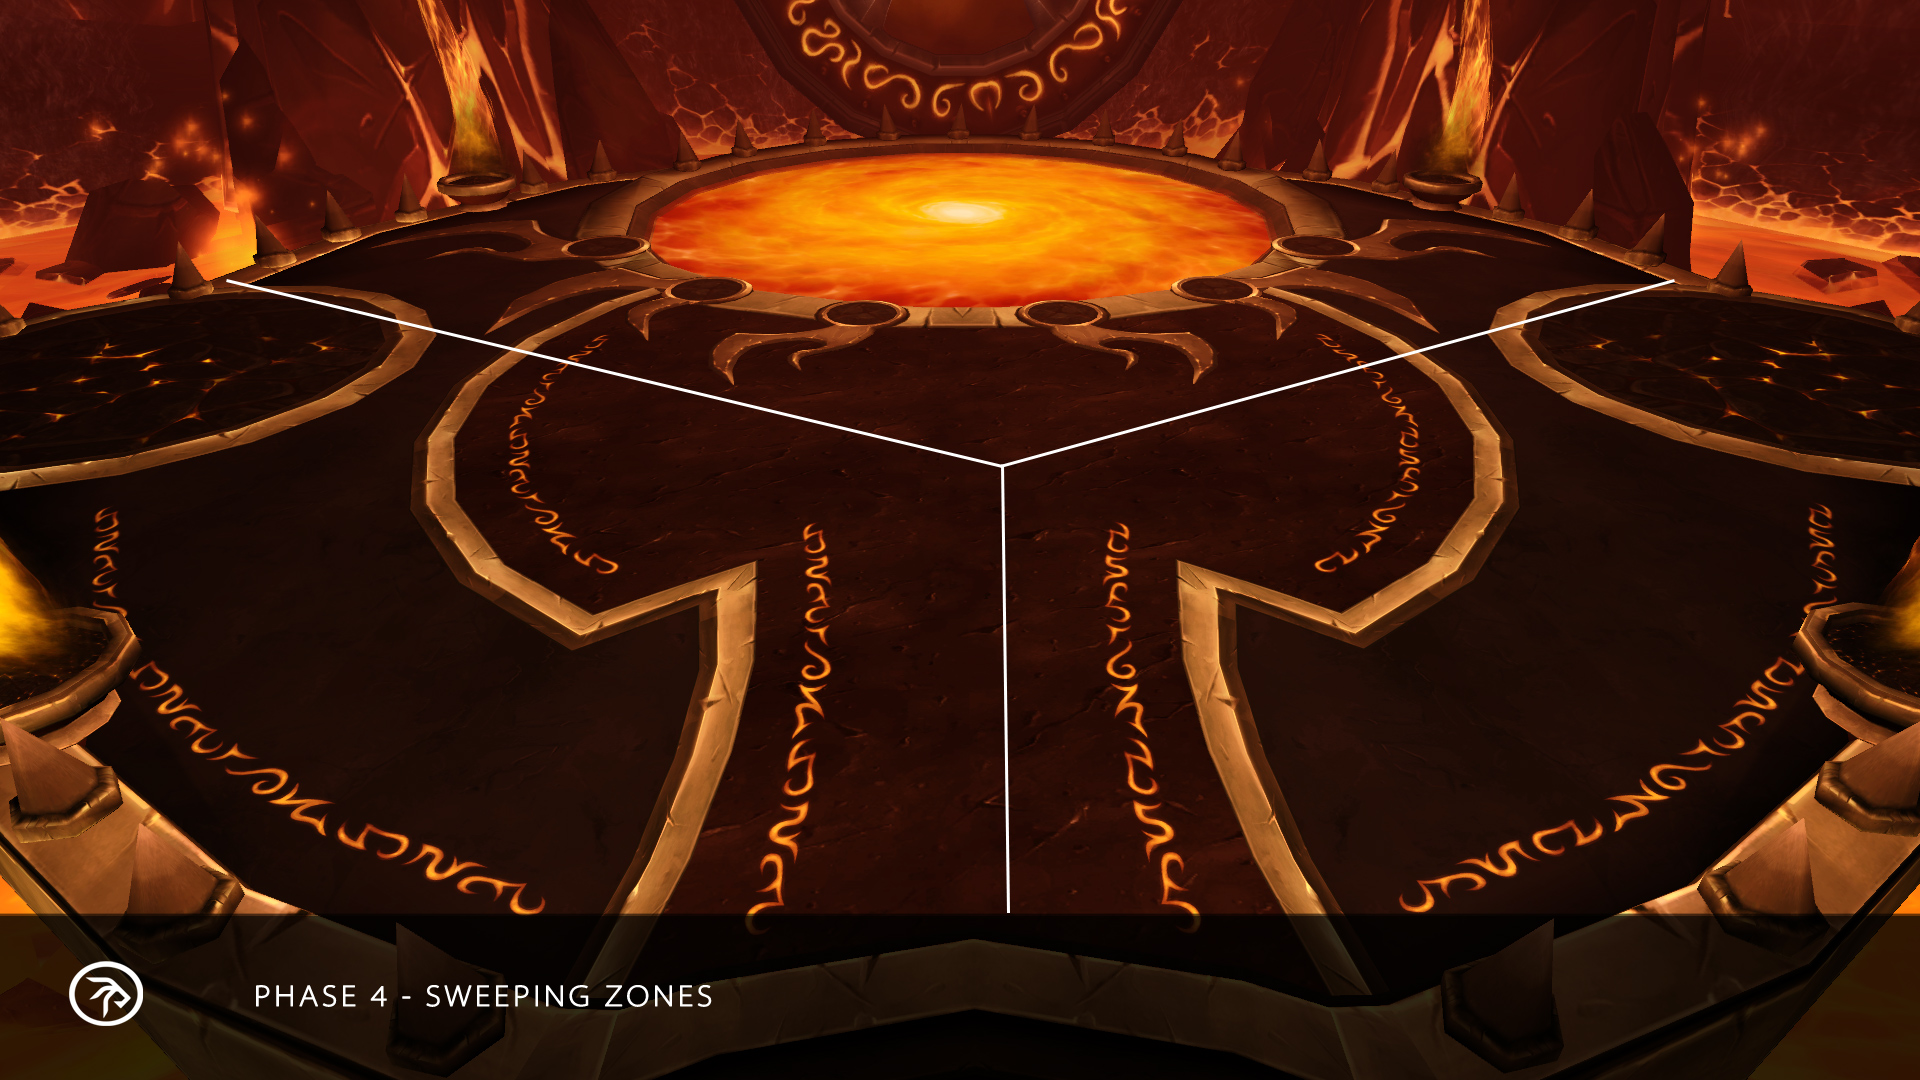
You should have 3 designated players who will take the Deluge from Cloudburst and sweep the Dreadflames; good choices for this job are druids, rogues and mages because they all have abilities that improve mobility. Having engineering is also beneficial for the very same reason. The sweepers should agree on splitting the area into zones to avoid 2 players running for the same Dreadflame spawn, leaving another spawn unattended, however as the spawn points are very random they need to be ready to adapt. Deluge also grants immunity from the Superheated damage, so the sweepers will never need any heals.
We have 2 people assigned to each meteor and put raid marks on the meteors during the brief interlude between phases 3 and 4 so the knockers can keep track of their meteors. Since knocking back the meteors still gives the stacking DoT it's generally a good idea to use classes with passive damage reductions to knock them to avoid stressing out the healers too much. Each primary knocker should take 4-7 stacks of the DoT depending on the situation and then tell the backup knocker to take over until his stack has expired. It's also important to try to not knock back the meteors whenever the sweepers are in such positions that they might get hit by the meteor.
The raid is split into three piles for standing in the Breadth of Frost without triggering Magma Geyser. We use 6 raid marks, 2 in each camp, to ensure that there's minimal chance of not having a player with mark in the spot for each camp due to meteor fixates. When setting up the camps it's extremely important that everyone stands exactly on the same spot, and if one has to run away from the camp for any reason it must be done by first running directly away from the patch and only then turning to run in the actual direction.
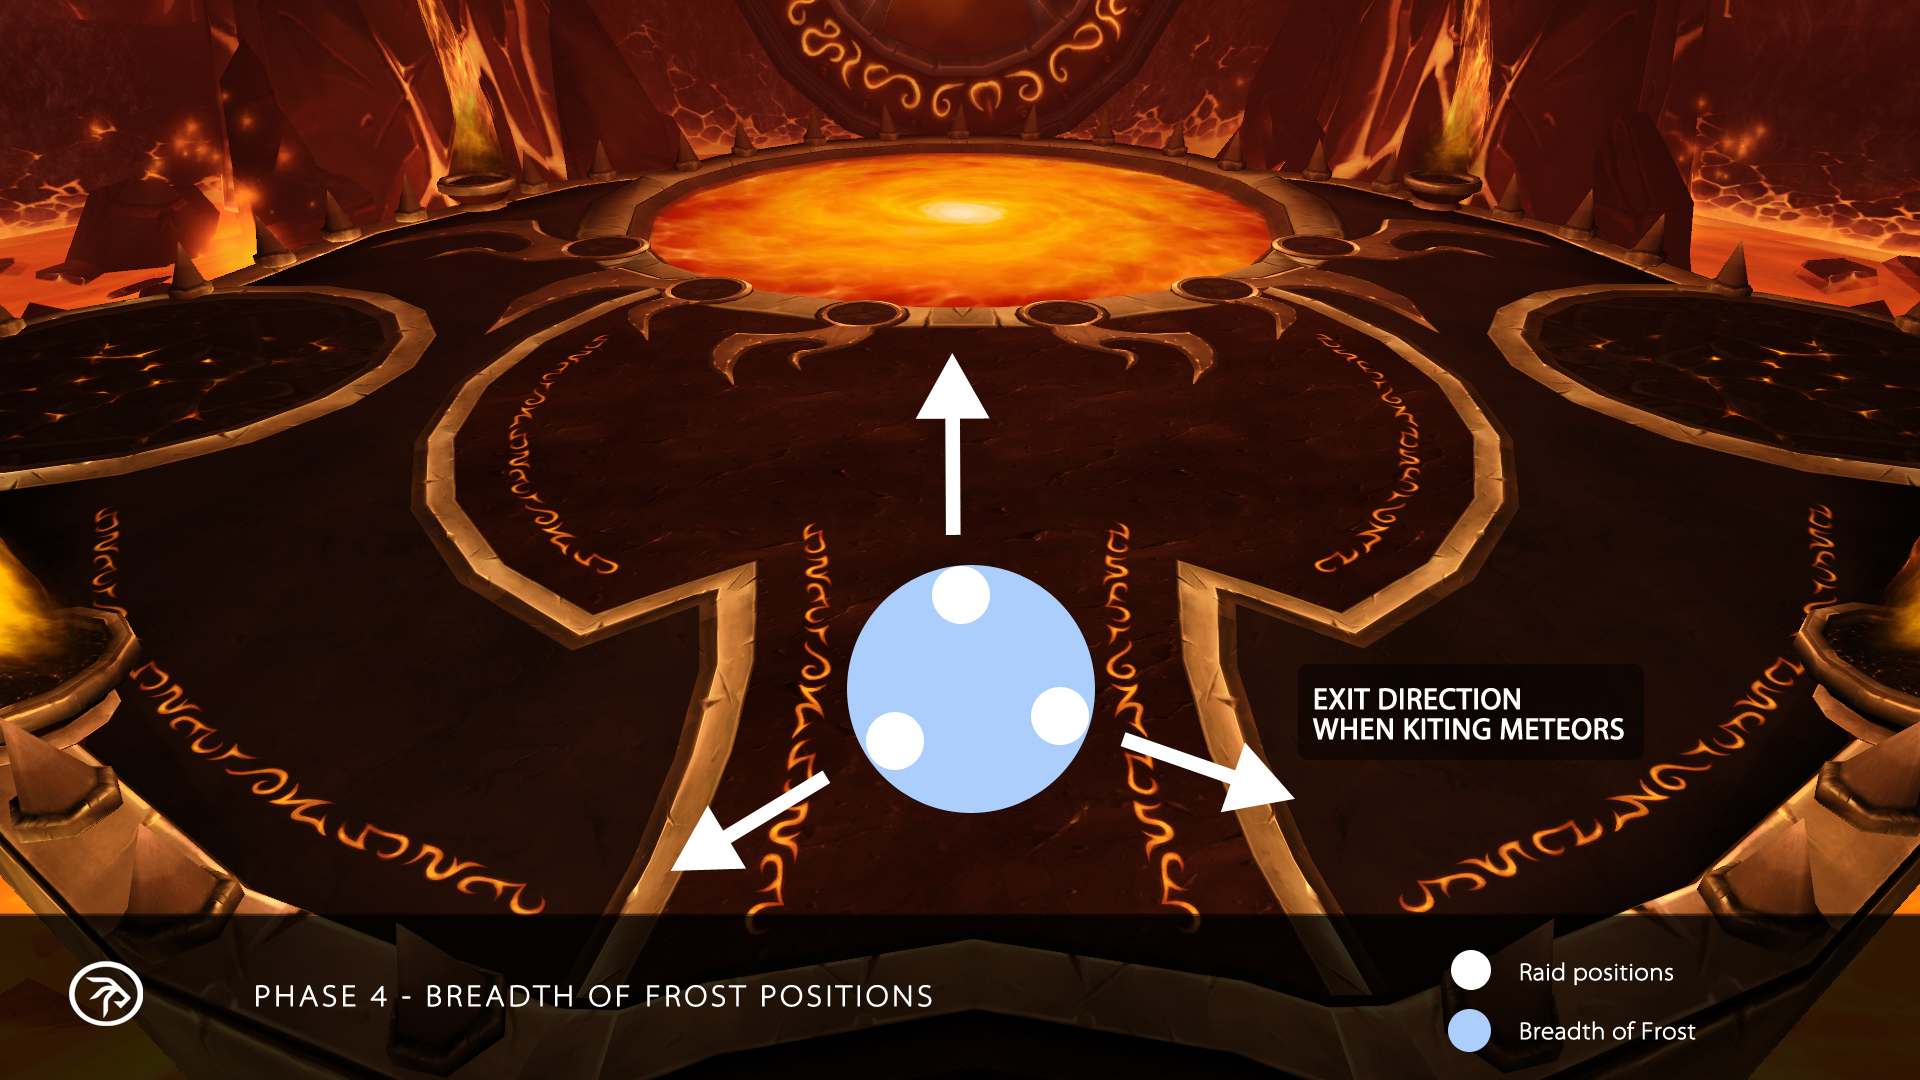
When the second Breadth of Frost is spawning you have to make the decision whether to bring the meteor into the first right away or not. Generally, if the second patch is nearby you can bring the meteor to the first right away and nuke it down, however if the second patch spawns very far you might need to delay. The first patch will disappear shortly before the third spawns.
When taking a meteor down it's extremely important to communicate with the raid so that everyone knows to run away from the frost patch, not to knock the meteor back and to switch dps to it so it will die while it's frozen. The dps requirement is not very tight, but not getting a meteor down with one patch will make the phase considerably harder so it's important to only bring a meteor to a patch if the situation will allow it to be properly dpsed down.
The tanks generally hold the boss near a frost patch but stand outside the patch so the back of the boss is towards the melee dps standing in the patch, and reset their Superheated stacks by running directly into the nearest camp and then back out again.
Once Entrapping Roots are being cast the tanks need to pay attention to where the roots will spawn, as the boss must be taken into them only after he has cast Empower Sulfuras. If the boss is taken into the roots too early your only hope is to taunt-kite it around until Empower Sulfuras expires, as if it reaches melee range of whoever has aggro while Empower Sulfuras is active it will instantly kill the whole raid.
Eventually the Dreadflames will start to overrun the area and it becomes extremely important that you communicate to the sweepers whenever the flames are about to overrun a camp in the frost patch. When that happens the people in the camp need to move out (possibly also the other camps if needed) to make room for the sweepers to clear the area, then move back after the area is clear before Superheated stacks too high for the healers to outheal.
Healing tips: Tanks will take much more damage than before and will need some serious heals. Also be aware that there may be range issues when the tanks run for the roots - a paladin is a prime candidate for running after the tank as glyphed Divine Protection is very good and gives you a sprint for getting back to the frost patch afterwards. Raid must use healing cooldowns when switching from one frost patch to another, especially if the distance between patches is long. If the new patch is nearby it's a good idea to stand in the old one as long as possible as a healer so you can heal the raid while they're moving to the new one, as that's when they're taking the most damage.
- Log in to post comments
Comments
inb4 world #956 kill of ragnaros heroic.
Mon, 01/08/2011 - 06:24
Nice guide Kruf!
Stay tuned
Mon, 01/08/2011 - 12:32
In fact Xenophics deserves some credit too as she did a large part of the actual writing, I only wrote a part of this and did the finishing touches.
Mon, 01/08/2011 - 13:05
Oh
My
God
3 healers ...
Thanks for the guide.
Mon, 01/08/2011 - 13:27
Are Anaram, Krimsy and Fragi alts? I don't see them on your player roster.
Nice strat guide and thanks a lot for that epic kill vid!
Mon, 01/08/2011 - 16:47
Anaram and Fragi are both mains though Fragi will change his main in a few weeks.
Krimsy is Smirks alt.
Mon, 01/08/2011 - 19:29
Unbelievablely team with only 3 healers ( a holy paladin included). that stands for only 2 healers must heal least 20 men . That's really .. AMAZING.
Thanks a lot for your guide . Good job.
Thu, 04/08/2011 - 06:13
exilirating kill , godlike performances , dream paragon ...keep inspiring me!
Fri, 05/08/2011 - 04:23
How many healers will it take for the first kill WITHOUT Shard of Woe?
Sun, 07/08/2011 - 05:15
Hey guys awesome kill! I wonder what it will take us normal people to kill him :P Anyways perfect performance as usual. Gratz :)
I was wondering is Anaram Xaar? If not where did Xaar go?
Tue, 16/08/2011 - 01:11
When we migrated to Lightning's Blade arx's "real" nickname "arx" wasn't free. So he picked up xaar as his druid's name. The nickname arx became available a few months ago and he wanted to have original nickname on the character hi is playing on, and renamed xaar to arx.
Tue, 16/08/2011 - 09:44
pretty much the only reason i raid is 'cos you guys are so epic..but whoa??!?? only 3 healers??
just insane!
Mon, 29/08/2011 - 12:47
Hey Paragon :)
I have been watching your heroic Ragnaros kill video for the last few weeks and every time I am blown away at how amazing you guys are. I just found this page tonight and had a read over. It seems there are quite a few little tips here and there on how to survive or improve dps that I would never have thought of. It's great to see such dedication to being the best, keep it up!!
You mentioned that it took 500+ wipes to get this boss down, at what stages did you spent the majority of those wipes and what was the hardest part about this fight in general?
Grats from South Africa
Wed, 21/09/2011 - 23:16
We actually started counting the wipes and their reasons at a certain point during Ragnaross progress, but I don't have the file with me so I can't check. It's hard to say which phase we wiped to the most, since all of them had their share of learning. I think we wiped the least to phases 1 and 4, because 1 was so easy and we reached 4 with 2 meteors so rarely. So phases 2 and 3 took most of the wiped (because of the though dps requirement of p3 and the skill checks of both phases).
The hardest part (I'd say) is to make it to phase 4 with enough combat resses and 2 meteors. There is just so much you can wipe on along the way of this incredibly long fight.
Sat, 24/09/2011 - 16:14
Sounds really tough! Grats again ^^
Good luck with 4.3 and Deathwing, I'm behind you guys all the way!!
Fri, 30/09/2011 - 01:15
The two-headed ogre Cho'gall is the fourth boss of the Bastion of Twilight and the last on the normal difficulty setting. A number of Adherents hasten to help Cho'gall, whose death calls more enemies which become more and more over the time. swtorcreditus.com The two-headed ogre Cho'gall is the fourth boss of the Bastion of Twilight and the last on the normal difficulty setting. A number of Adherents hasten to help Cho'gall, whose death calls more enemies which become more and more over the time.
Mon, 16/01/2012 - 08:29